
![]()

The alinex server is a simple base system making it possible to easily use it for any application. The main part is it's HTTP/HTTPS server part but it may also include other server protocols like ftp later.
- full configurable
- supports multiple IPs, ports, ssl
- support vhost and spaces
- full debug and logging support
- authentication
- forwarding and redirects
- proxy support
It is one of the modules of the Alinex Universe following the code standards defined in the General Docs.


The easiest way is to let npm add the module directly to your modules (from within you node modules directory):
npm install alinex-server --save
And update it to the latest version later:
npm update alinex-server --save
Always have a look at the latest changes.
The usage is very simple, you have to load the server module first:
server = require 'alinex-server'
After that in your code you have to initialize the server:
server.init (err) ->
  return cb err if err
  # go on
Now you may add some specific routes:
server.route
  path: '/my-path'
  handler: (request, reply) ->
    # function handling this request
server.http.start ->
  # server is running
At the base this module manages any server like an HTTP or HTTPS server. Therefore it includes the basic server technology without specific applications.
Just now the only possible server is an http server.
The following architecture shows you how it is organized internally to learn how to customize it to your needs.
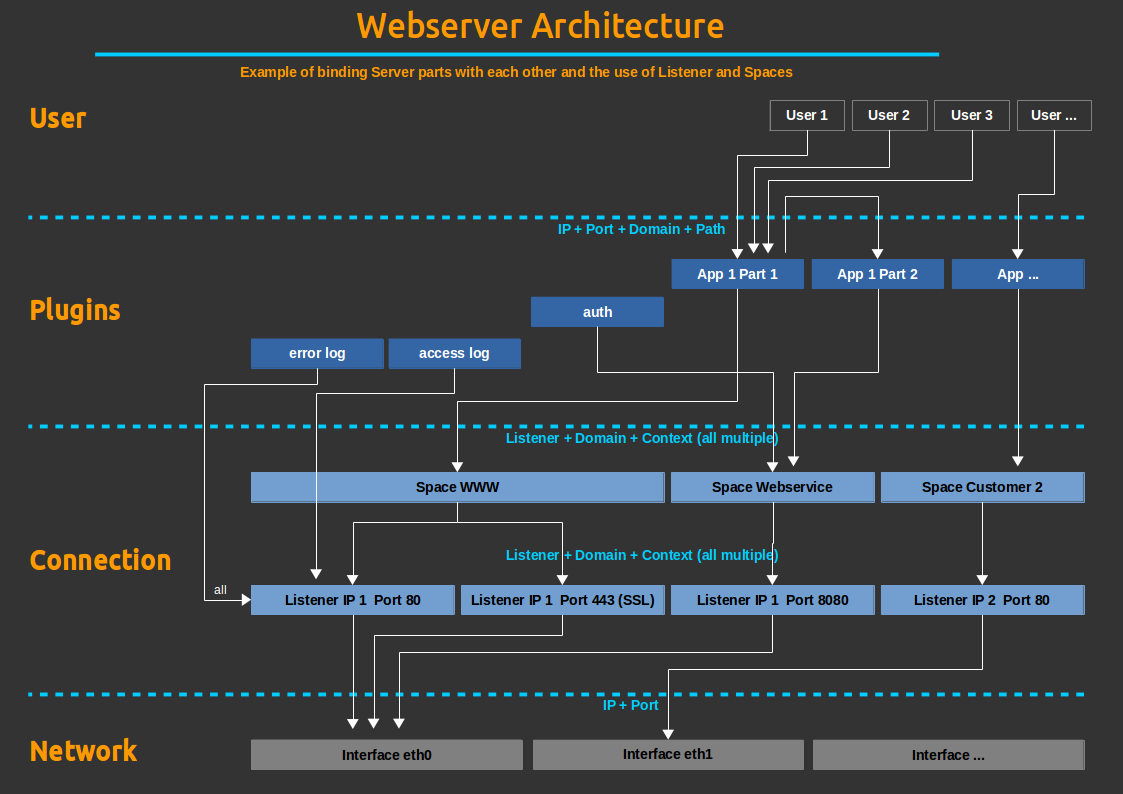
The server has two different bindings, first it should bind to the network to get the requests. Second it allows binding plugins to specific requests.
The arrows will show you some of the possibilities to connect the different server parts together. Because of the possibilities it may look complex at first.
The basic part of the connection to the network are the listeners. The server may listen on multiple or all IP addresses of the local host and may bind to multiple ports with HTTP or HTTPS protocols. For each Port binding and specific IP an extra listener has to be created.
The different listeners bundle all the used network connections for the server together and their names may be used later to bind spaces or apps to it. It also defines if an SSL protocol (HTTPS) will be used.
The concrete listener, virtual host (used Domain) and context (path) may be used to bind spaces and plugin to them.
To make administration of complex and big servers easier you may use spaces. They define an area over some parts of one or multiple listeners which belongs together. It is not necessary to do so but it helps you to make configuration easier and put all configurations of one space together.
If spaces are used and you bind a plugin to them the plugin will be bound only to this area or a subpart of it if specified.
Everything a user can use is specified using some plugins which may have their own configuration. They will be bound to a space, listener, domain and context path.
In the configuration you define them below the spaces to bind them to it or directly
below the http element to directly bind to the listeners. If you want a plugin to
be bound to multiple spaces you have to bind it directly to the listener or make
multiple entries for it.
The route specifies the handler for a specific URI scheme. Use it to add functionality to the server. Or you may collect some routes together in a plugin which you may add.
The main configuration is done using the Config module so that the end user may easily configure the server without changing the code.
See the files for `server/http' configuration to get a list of all possibilities.
A route can be bind to one of the following (bind params):
- space
- listener
- domain
- context
And it will work on one of the following:
- path
- method
What to do will be set up using:
- config
- handler
As handler you may also use the predefined ones:
- file
- directory
The server will response after a short time with it's routing table on the console. You are now able to access the server.
This is done the common way like all my modules using the debug module. So you
may start the server using the environment variable DEBUG=server* to show them
all.
Additionally heapdumps will be written to the log dir on unhandled errors if you enabled it in the configuration. They can be examined using the chrome developer tools: Press F12, go to the Profiles Tab, right click on Profiles, Load... and select the file to load.
Copyright 2015-2016 Alexander Schilling
Licensed under the Apache License, Version 2.0 (the "License"); you may not use this file except in compliance with the License. You may obtain a copy of the License at
Unless required by applicable law or agreed to in writing, software distributed under the License is distributed on an "AS IS" BASIS, WITHOUT WARRANTIES OR CONDITIONS OF ANY KIND, either express or implied. See the License for the specific language governing permissions and limitations under the License.